Also, the same with Lake in Dusk and Ruina Station dungeons. This dungeon also has Quest Capsules that can be use to fill those needed experience points to gain a level.

I don't want to waste your time anymore, I believe that I have already given enough information about the dungeon. So, now I give you Tower of the Undead B1F.

1. At first, when you walk down the small stairs. You need to kill "Pierce Hound Zombie".

2. After that, get the Blue Bead that was dropped it's a quest item.

3. Next move forward then turn right, you will see a well talk to it.

4. You will be asked to defeat a "Ice Hound Zombie" in order to obtain a quest item "Soul of Ice Hound Zombie Cuspid".


5. After obtaining the item then talk to the well again. The first door will now open, move forward then make a left then turn left again to locate the boss monster "Agrya".


6. Defeat boss monster "Agrya" to obtain the quest item "Black Bead".


7. After that look for a "Brazier" with a pile of bones below it. It is located near the first well that you saw. So, you need to go back a bit to locate it. After that, talk first to the "Brazier" then the "Pile of Bones" where you will obtain a quest item "Long Bone" then the Brazier again to obtain the quest item "Red Bead".


8. After obtaining the two items (Long Bone and Red Bead), move up and locate the two "Braziers" with two "Wells". You need to talk each "Brazier" as shown in the image below. First is the "Green" then the "Red". There are three braziers, the other is located on the place where you defeated "Agrya".


9. After talking to the last brazier, you will received a quest item "Tinderbox of the Dead".

10. Now, turn around and locate the torch as shown in the image below and talk to it to obtain the quest item "Gate Key (BLACK)".


11. You will use this key on the portal shown it will transfer you to another room. While talking to the portal, it will give you a "Werewolf Stone" this will be use on the other room.


12. Once you're already inside the room. Talk to the altar with blue flame in the center of the room because it will give you a quest to kill the "Werewolf".

13. After the defeating the "Werewolf", it will drop "The Parchment of Thaw" after picking it up. Talk to the altar again to receive the "Werewolf Gate Key" in order to get out of the room. Proceed to the portal after.


14. After getting out, proceed back to the hallway with the two braziers and two wells and move all the way to the last well as shown below.

15. Talk to the well then you will received a quest where you will need to talk to the wells in a particular order for you to obtain the needed quest item to open the next door. This item is the "Ice Seed". Follow the sequence below. First is the Green then the Red, the last Well is the first well that you saw when you enter this dungeon there you will get the "Ice Seed" when you have executed this correctly.


16. Now go back to the well near the locked door and talk to it. The lock door will open, it will also give you a quest item "Broken Lamp Part".


17. Once you enter, locate the "Broken Lamp" shown below and talk to it, you will receive a quest to turn lamps in a particular order.

18. Below is the sequence that you need to follow. Green, Red then Yellow. After that, move forward and locate the boss monster "Anelion".

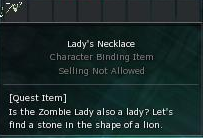
19. Defeat "Anelion" first to obtain the "Lady Necklace" after that talk to the broken lamp next to her.

20. Then, talk to the "Lion Head" shown below, it will tell you that you need to fix another broken lamp. It is located down the hallway where the Lion head is facing. Talk to the broken lamp to open the lock door next to it.

21. When the door opens, you need to defeat (1) one "Ice Ghoul Warrior Zombie".

22. After defeating one, go back to the Broken Lamp located where you fought "Anelion". Talk to it and it will tell you that another door was opened. Go back to the "Ice Ghoul Warrior's" place. You will encounter there the boss monster "Vuischekra".

23. After defeating the boss monster, it will drop a quest item "Ghoul Shackles".

24. Move up to the next hallway until you locate a "Brazier", talk to it then it will give you a quest to defeat 20 Ice Ghouls.

25. After completing the quest, talk again to "Brazier" it will give you a quest item "Arrow Head".

26. Move up then you will see, locked gates and two Lion heads in the center. Take the right one and talk to it. A gate will open, go inside it to locate a "Chest", destroy it then you will lock inside where two "Crimson Bats" will appear, defeat those two then you can now proceed in destroying the locked gate.


27. After destroying the game, look for the boss monster "Rettooth" and defeat it.

28. After that, go back and talk to the other Lion head located on the left where it will give you a quest item "Empty Bottle".
29. After receiving the item, another locked gate will open. Proceed to the generator-like thing and talk to it. It will give a quest to gather "Specters" of different monsters. These are Ice Ghoul Warrior, Ice Lady and Ice Babayaga. (Don't need to tell the location of these monsters, you just need to go back to locate them.)


30. After collecting the items, go back to the generator-like thing and submit the items. It will give you a "Spirit Gate Key"

31. Then you will be teleported into another room, it looks like a church. Talk to the standing torch in the beginning. Also, take note of the "Piano" near it, that will be useful later on. The purpose of the standing torch is to break an ice wall up ahead.

32. Move up, then talk to the Library Shelf on the right, it will also break an ice wall. Then talk to the podium to summon a boss monster "Pertz Von Zatellerean". (Note: You need to lure the monster on the location shown below because another boss monster will appear together with an ice wall located before the podium. So you need to let your party members on the same spot so that they won't be left behind).


33. After defeating Pertz Von Zatellerean another boss monster will appear "Libers Pertz Von Zatellerean" when you manage to defeat this monster it will drop a "Crystal Eyeball".


34. Now, head to the "Piano" (The one I told about that will be useful). It's near the standing torch when you first came to the room and get the "Castle Lord's Gate Key".


35. Now exit the room to the warp portal on the left side of the Podium. Once teleported, you will be in a fork-like place. Talk to the "Middle Post" first then take the entrance in the "Middle".

36. After that, talk to the "Pile of Weapons" indicated in the image below to open the gates and defeat "Frozen Watcher Zombie".

37. After defeating the monster, it will drop a quest item "Cold Scale" and it will open another gate. Go down the stairs and talk to the "Banner" standing in the middle of the room.


38. You will be ask to defeat "Captain Crush Zombie" in order for that monster to appear you need to defeat all the monsters named "Crush Zombie".

39. After defeating it, talk to the "Banner" again, it will let you chant a spell to finish your quest but "General Zombie" will appear in the end. Defeat it to obtain a quest item "Broken Device" and to open a gate to continue.

40. After obtaining the needed item (Broken Device) proceed to the next room. Talk to the door with bones on the wall then talk to the torch on the right side.

41. Now, turn left take the corridor and up a stair to locate the other two torches. Talk to it, then talk to the face statue next. It will summon (4) four Stone Golems. (Note: You can also defeat "Frozen Warrior Zombie" for a quest but it doesn't have anything to do with the quest)

42. Defeat the Stone Golems until the boss monster "Axion Stone Golem" appears. Once the boss monster is defeated it will drop a quest item "A Half Core".


43. Now, talk to the tomb with blue flame near the torches. It will give you quest to defeat (4) four Frozen Fighter Zombies and (2) Frozen Slaughter Zombies. You will locate them easily but I suggest you take down these monsters near the door with bones on the wall to submit the "Broken Device" to get the reward.

44. Once you finish defeating the needed monsters, go back to the tomb with blue flames to finish the quest. And continue to next room and you will see the boss monster "Frozen Slayer Zombie", defeat it to receive the quest item "The Old Record".


45. Once you obtain the item, talk to the tomb in the middle and it will give a quest to search the banners close to it. Talk to the banners indicated in the image below first is the green one then the red. After that, talk to the tomb again to obtain the quest item "Dried Stone", the gate will open.


46. Make your way to the next room and locate the "Book" under a Cross as seen below. It will give you a quest to defeat (3) three Flesh Golems.

47. Move up and you will locate the monster named "Frozen Prime Knight Zombie", this monster is not important in any quest but if you want extra loots you may defeat it for a chest.

48. Now, the (3) three Flesh Golems. These monsters are strong and once you defeat them they will drop a treasure chest. There are five of them in the corridor shown below. So, you decide if you want to defeat all or just three to finish the quest. Once, you completed the quest head back to the "Book" but now talk to the "Cross" to finish the quest and it will give you "Old Spiderweb".


49. Now take the route where you defeated the "Flesh Golems" at the end, you will see the device shown in the image below. Talk to it and it will teleport you to "Mergaheph's Chamber".

50. Once inside, head north to locate "Mergaherph" the final boss.

51. After defeating the final boss, get "Mergaherph's Tooth" then turn around and locate the clock shown in the image below to obtain the "Golem Gate Key" for you to exit the room.


52. Now, exit the room you will return to the fork-like chamber with three entrances. At first, you took the middle entrance but now you need to take the entrance through your right but you need to talk to the monument at the middle first.

53. You will be teleported back to the place where you enter the chamber of Mergaheph. Take the stairs down and talk to the tomb. A "Chest" will appear and when you destroy it, that will conclude your take on this dungeon.

Well, there you have it. I hope I have given you enough information about this dungeon. Good Luck!
Here's my sample run on the dungeon in case you got lost or forgot anything. I have skipped my battles from boss monsters since it will take time but basically all you need to do is in this video. (Note: I have used my other character due to the Exp Event my Warrior have exceeded the required level to enter the dungeon.)
No comments:
Post a Comment